Monday, 2 May 2011
End Credits
When I came to end of my main animation sequence I had to think about how to show my name at the end. Because of how I created my animation with the rough and ready style I wanted to keep this in the credits. I decided to zoom out of the set showing my desk and work surface, then zooming back in towards some spare card on which I wrote my name. I think this is a nice end to the animation and fits really well with the main part, here you can see the images I used.


Music Editing
After the animation sequence was created I had to edit my music to get the 30s I wanted. This was fairly simple to do because I downloaded a free trial of a music editing program. After I had saved this I imported it into my imovie and made sure it lasted the full length of my animation.


Imovie editing
Here you can see my development throughout imovie from iphoto which I imported all the animation frames from. When all the frames were in the right place I adjusted each frame time to 0.1s per frame. This was as fast as imovie would allow me to have each frame but this still made the animation run how I wanted, with the jerky DIY effect.


Iphoto
To create my animation I used iphoto and imovie because these two programs work very well together and it is easy to change a series of images into an animation. After I had taken all my images I Imported them into Iphoto which these screen shots show. From here it was easy to put these into imovie so i could change settings and add music.


Making my set and characters
Before I started creating my animation I needed to create a set that was suitable for my idea. I brought multi coloured card sheets which I would use to make everything I needed. Using these I would create a rough, DIY, cut out style animation, this was my favourite style when I was considering different methods.


Monday, 11 April 2011
Storyboard
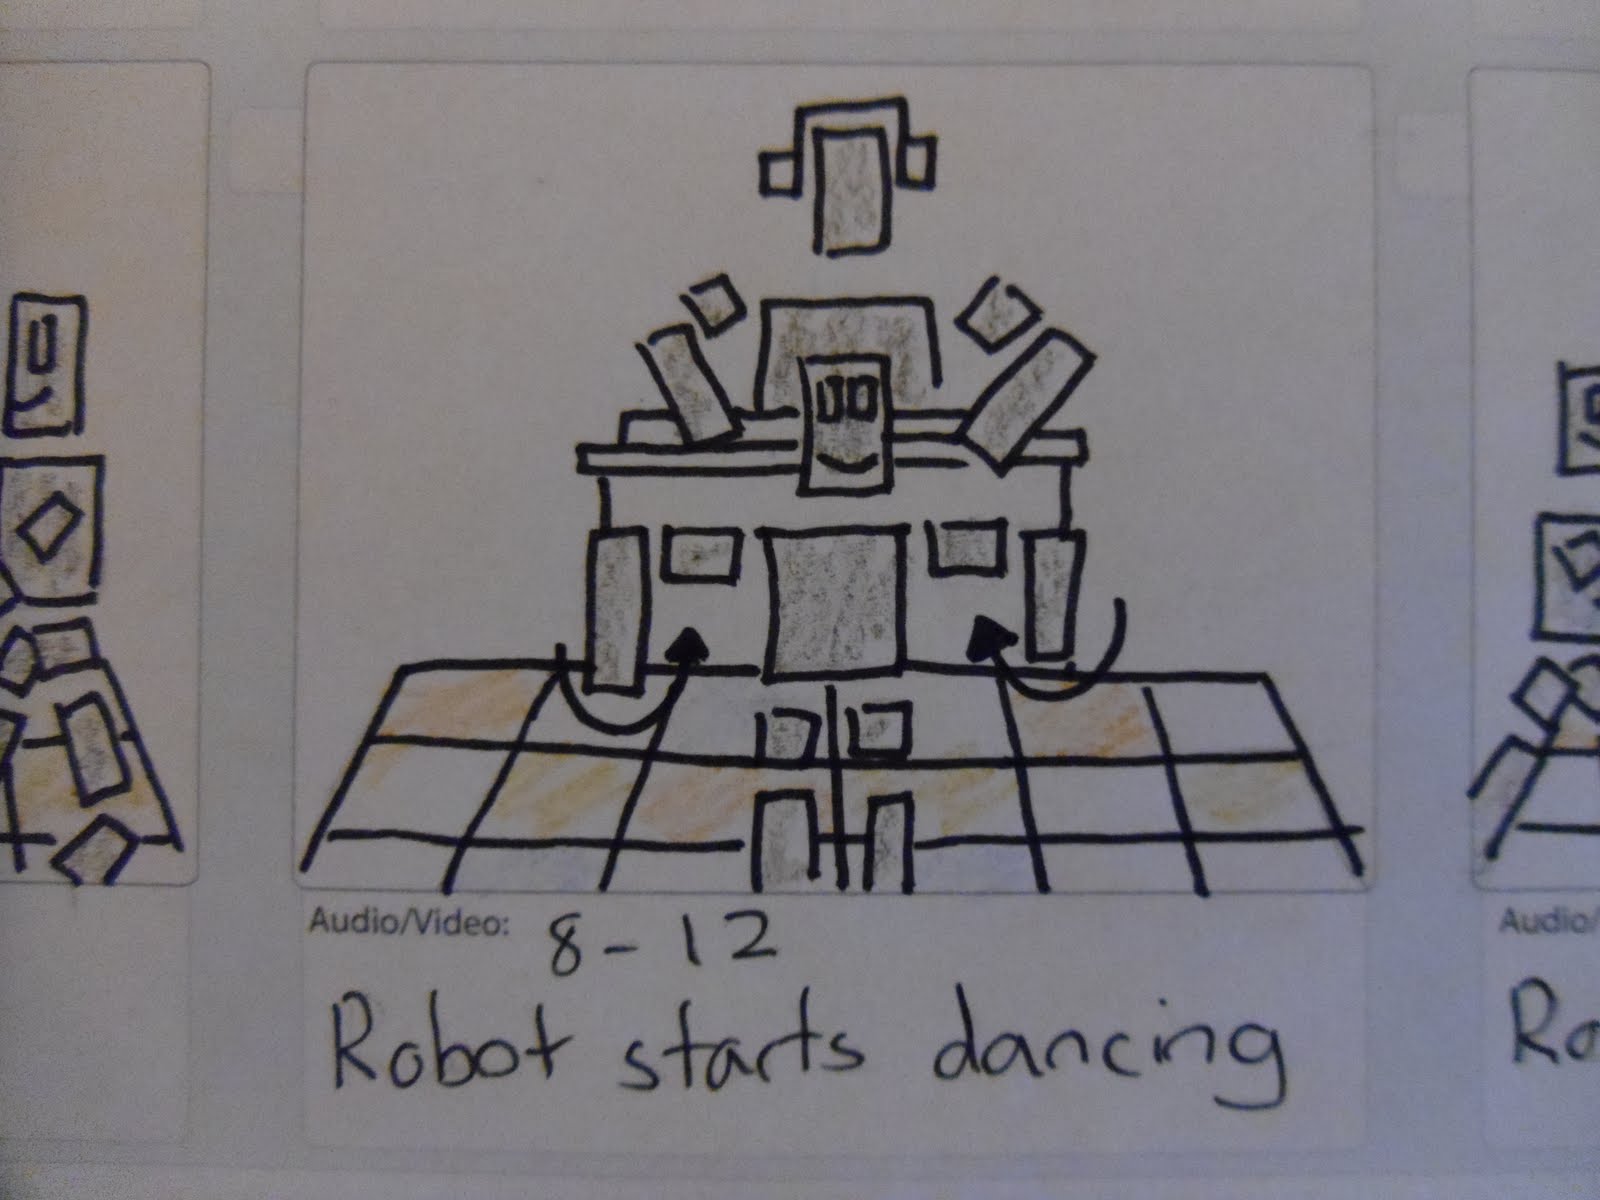
This is the first copy of the story board I created, I made this using the robot disco idea. Each frame shows a sketch of what is going on in the animation how roughly how long for. I have also put a little bit of colour in, this is just to get and idea on what would work well.


Storyline ideas
After deciding on my character I did another idea generation for a storyline. I then knew I wanted to do a animation on a robot dancing and created a few rough storyboards, these were created based in various sets, such as a futuristic street, a planets surface or disco. I really liked the idea of a robot in a disco so this is the one im going to base my next storyboard on.


Character Development
After practising and researching robot drawings I created a few sketches of my own, some of these were similar to the first drawings but I changed them and gave them their own different characteristics. I then thought of using several cut up parts to form a robot, this would make it easy to move and position the way I wanted. After this I created some more drawings with this idea in mind and came up with the robot character shown below.


Tuesday, 5 April 2011
Robot Cartoons
After my initial ideas and sketches I researched some robot specific animations. I found these two on youtube, they seem very simple and are hand drawn but I like the effect these have. I like the basic and stereotypical robot designs that have been used and I may use this same type of design in my animation.
Some Ideas
I created another list, but this time I was think of some ideas of which the animation could be about. Such as if I were to use robots what would they be doing, and at which points in the music etc and also what kind of animation I want to use such as stop motion. These are only starting ideas but things I will take into consideration when im start to look at my story board.

Vector Drawings
I created some quick vector drawings of robots, this was again to try some different techniques that could possibly be used in my animation. I do like the style of these robots and I think I could create some good characters on Illustrator.

Rayograms
These are four rayograms I created in a workshop using four different objects, headphones, keys, drumsticks and coins. I tried to vary the shape and size of the objects to see how much different each one came out. I also changed the exposure on some to see what effect that would give to the print. I like this effect but for my animation I think I will use a more hand drawn approach.


Robot Sketches
The main thought after my music was robots, so I decided to draw a few different styles of robots in my sketchbook. These were just copied from the internet, so I could see what people think when they imagine a robot and how I should design mine if I am to use them in my animation.


First thoughts on hearing music
After first hearing my music I created a quick list of words and themes that came into my head as I was listening to it. I can take ideas from this list when I am developing my final outcome so it fits well with the music.

Stop motion Workshop
Here is a quick stop motion animation I created with a group of my class mates in a workshop. This is a simple but effective way of creating an animation. I like how it was easy to manipulate the camera angles and the close ups to make it more interesting.
Monday, 28 March 2011
Research - Animation 1
I had a look at some short animations on youtube, I liked these so I uploaded some examples onto here. These range in styles and complexity but all are effective and interesting in there own way. I have not yet chosen specific videos which relate to my music these are just general examples.
My Music - Squarepusher Kill Robok
The music I was giving was called Squarepusher Kill Robok. The first thing that came to mind when I listened to this was that it had a very futuristic and techo like feel. This made me think of robots or other future like objects. I did a couple of brainstorms, just to write down what first came into my head when I listened to this music.
New Project - Print to Pixel
A short post to show the start of a new project, print to pixel. Im looking forward to this project, it looks fun and could have some interesting outcomes. I have to create a 30 second animation which is based on a piece of music we have been given.
Sunday, 13 March 2011

Saturday, 12 March 2011
Chosen Photograph
After several photographs I finally got one which was just what I wanted. I managed to get the shadow just right along with the positioning of all the different models and type. At this point I was very close to finishing the poster, I just needed to add the logo of GF Smith onto it. I found the image on the website which you can see below the photograph, I then added this to my poster.


Subscribe to:
Posts (Atom)